摘要
ViewRootImpl#performTraversals()详细分析
理解MeasureSpec
MeasureSpec参与了View的measure过程,在很大程度上决定了一个View的尺寸规格,但measure过程还受父容器的影响,因为父容器影响View的MeasureSpec的创建过程。measure过程中,系统会将View的LayoutParams根据父容器所施加的规则转换成对应的MeasureSpec,然后再根据这个MeasureSpec来测量出View的宽高。
MeasureSpec代表一个32位int值(避免过多的对象内存分配),高2位代表SpecMode,低30位代表SpecSize,SpecMode是指测量模式,而SpecSize是指在某种测量模式下的规格大小。
- MeasureSpec.EXACTLY //确定模式,父View希望子View的大小是确定的,由specSize决定;
- MeasureSpec.AT_MOST //最多模式,父View希望子View的大小最多是specSize指定的值;
- MeasureSpec.UNSPECIFIED //未指定模式,父View完全依据子View的设计值来决定;
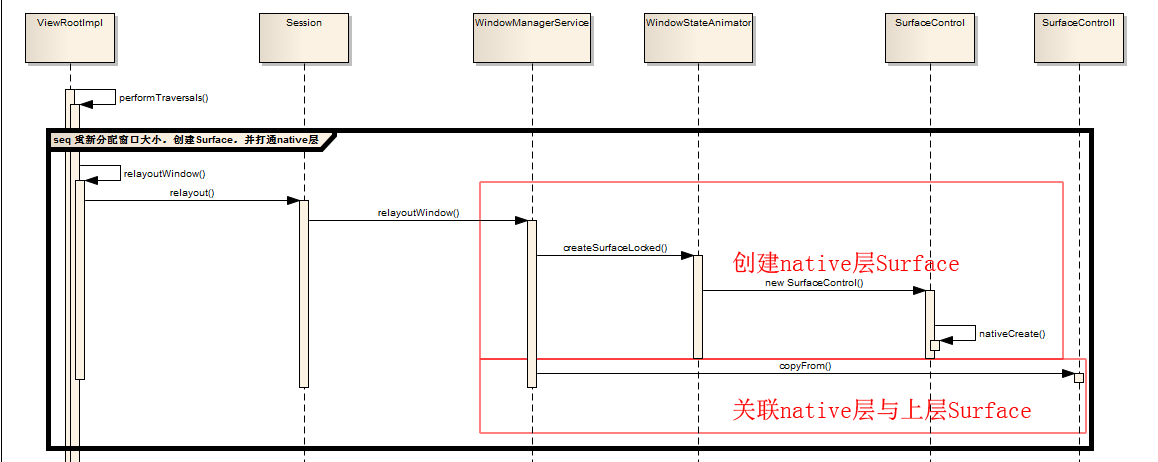
relayoutWindow()之前
1 2 3 4 5 6 7 8 9 10 11 12 13 14 15 16 17 18 19 20 21 22 23 24 25 26 27 28 29 30 31 32 33 34 35 36 37 38 39 40 41 42 43 44 45 46 47 48 49 50 51 52 53 54 55 56 57 58 59 60 61 62 63 64 65 66 67 68 69 70 71 72 73 74 75 76 77 78 79 80 81 82 83 84 85 86 87
| private void performTraversals() { // cache mView since it is used so much below... final View host = mView; ...... if (host == null || !mAdded) return; ...... mWindowAttributesChangesFlag = 0; Rect frame = mWinFrame; // 2.判断是否是第一次遍历 if (mFirst) { ...... // 3.如果是第一次遍历,就调用dispatchAttachedToWindow,所有子视图都把mAttachInfo的值复制到自己的mAttachInfo中 host.dispatchAttachedToWindow(mAttachInfo, 0); mAttachInfo.mTreeObserver.dispatchOnWindowAttachedChange(true); dispatchApplyInsets(host); //Log.i(mTag, "Screen on initialized: " + attachInfo.mKeepScreenOn); } else { desiredWindowWidth = frame.width(); desiredWindowHeight = frame.height(); // 4.如果不是第一次,判断窗口大小是否有变化,如果有,则会将下面三个变量置为true。 if (desiredWindowWidth != mWidth || desiredWindowHeight != mHeight) { if (DEBUG_ORIENTATION) Log.v(mTag, "View " + host + " resized to: " + frame); // 需要全部重绘 mFullRedrawNeeded = true; // 需要重新布局即重新为视图指定位置 mLayoutRequested = true; // 窗口大小可能改变 windowSizeMayChange = true; } } // 5.如果visibility发生变化,将调用host.dispatchWindowVisibilityChanged将这个变化通知给所有的子视图 if (viewVisibilityChanged) { mAttachInfo.mWindowVisibility = viewVisibility; host.dispatchWindowVisibilityChanged(viewVisibility); host.dispatchVisibilityAggregated(viewVisibility == View.VISIBLE); if (viewVisibility != View.VISIBLE || mNewSurfaceNeeded) { endDragResizing(); destroyHardwareResources(); } if (viewVisibility == View.GONE) { // After making a window gone, we will count it as being // shown for the first time the next time it gets focus. mHasHadWindowFocus = false; } } // Non-visible windows can't hold accessibility focus. if (mAttachInfo.mWindowVisibility != View.VISIBLE) { host.clearAccessibilityFocus(); } // Execute enqueued actions on every traversal in case a detached view enqueued an action getRunQueue().executeActions(mAttachInfo.mHandler); boolean insetsChanged = false; boolean layoutRequested = mLayoutRequested && (!mStopped || mReportNextDraw); if (layoutRequested) { ...... // Ask host how big it wants to be // 6.测量判断window的大小是否需要改变 windowSizeMayChange |= measureHierarchy(host, lp, res, desiredWindowWidth, desiredWindowHeight); } ...... if (mFirst || windowShouldResize || insetsChanged || viewVisibilityChanged || params != null || mForceNextWindowRelayout) { ...... try { ...... // 7.重新分配窗口大小,创建Surface,并打通native层 relayoutResult = relayoutWindow(params, viewVisibility, insetsPending); } ...... }
|
步骤3
结合Android视图之何处触发View的绘制给出的Android之ActivityThread的调用图,可以知道在Activity首次执行onResume()方法后,ViewGroup#dispatchAttachedToWindow()方法会被调用,首先执行父类的dispatchAttachedToWindow()方法,然后对每个子类View都执行dispatchAttachedToWindow()方法;
1.因DecorView重写了onAttachedToWindow()方法,
1 2 3 4 5 6 7 8 9 10
| @Override protected void onAttachedToWindow() { super.onAttachedToWindow(); final Window.Callback cb = mWindow.getCallback(); if (cb != null && !mWindow.isDestroyed() && mFeatureId < 0) { cb.onAttachedToWindow(); } ...... }
|
会先调用super#onAttachedToWindow()方法,然后获取Window.Callback cb,这个Window.Callback是在Activity#attach()方法中通过mWindow.setCallback(this)设置的,所以最终调用的是 Activity#onAttachedToWindow();
2.如果我们调用过View#addOnAttachStateChangeListener()方法,那么在View的dispatchAttachedToWindow()方法中,会执行以下代码,
1 2 3 4 5 6 7 8 9
| ListenerInfo li = mListenerInfo; final CopyOnWriteArrayList<OnAttachStateChangeListener> listeners = li != null ? li.mOnAttachStateChangeListeners : null; if (listeners != null && listeners.size() > 0) { for (OnAttachStateChangeListener listener : listeners) { listener.onViewAttachedToWindow(this); } }
|
遍历listeners告诉那些add过OnAttachStateChangeListener的View,onViewAttachedToWindow()方法执行了。
步骤6
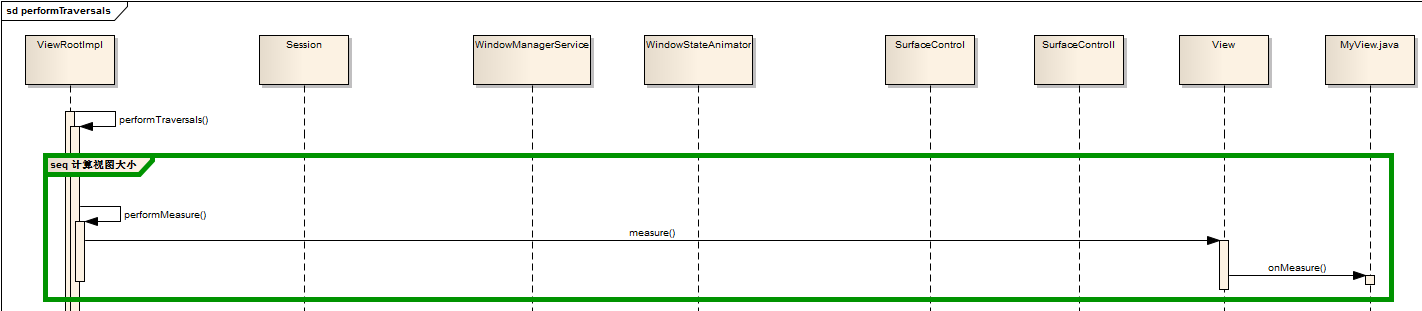
执行ViewRootImpl#measureHierarchy()方法对窗体进行测量。
1.当前Window布局的width属性肯定是MATCH_PARENT,先通过getRootMesasureSpec获取DecorView的基础大小规格。除非布局是WRAP_CONTENT,这时需要对子View遍历measure后才能确定外,MATCH_PARENT和确切的大小都能够立即确定;
2.然后执行performMeasure()。
relayoutWindow() 重新分配窗口大小,创建Surface,并打通native层
调用WMS的relayoutWindow来调整窗口属性并将上层Surface对象与底层Surface打通。
把视图布局中的相对值转换为具体值,最后保存在mMeasuredWidth和mMeasureHeight中。
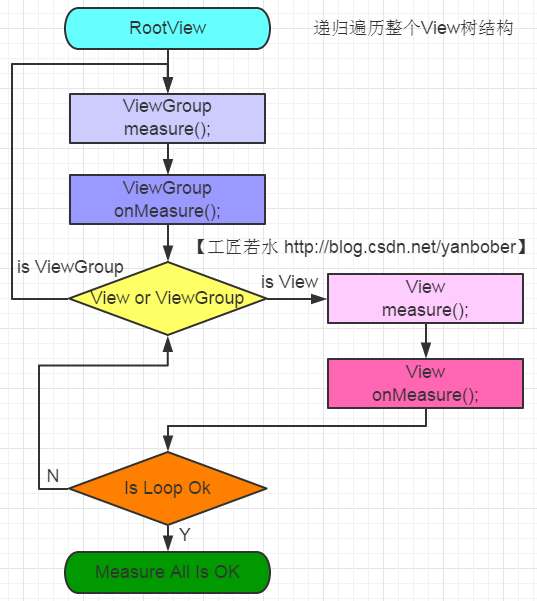
整个View树的源码measure流程图如下,转载自Android应用层View绘制流程与源码分析:
结论:
1.最顶层DecorView测量时的MeasureSpec是由ViewRootImpl中getRootMeasureSpec方法确定的(LayoutParams宽高参数均为MATCH_PARENT,specMode是EXACTLY,specSize为物理屏幕大小)。
2.View的measure方法是final的,不允许重载,View子类只能重载onMeasure来完成自己的测量逻辑。
3.使用View的getMeasuredWidth()和getMeasuredHeight()方法来获取View测量的宽高,必须保证这两个方法在onMeasure流程之后被调用才能返回有效值。
1 2 3 4 5 6 7 8 9 10 11 12 13 14 15 16 17 18 19 20 21 22 23 24 25 26 27 28 29 30 31 32 33 34 35 36 37 38 39 40 41 42 43 44 45 46 47
| protected void onMeasure(int widthMeasureSpec, int heightMeasureSpec) { setMeasuredDimension(getDefaultSize(getSuggestedMinimumWidth(), widthMeasureSpec), getDefaultSize(getSuggestedMinimumHeight(), heightMeasureSpec)); } public static int getDefaultSize(int size, int measureSpec) { int result = size; // 通过MeasureSpec解析获取mode与size int specMode = MeasureSpec.getMode(measureSpec); int specSize = MeasureSpec.getSize(measureSpec); switch (specMode) { case MeasureSpec.UNSPECIFIED: result = size; break; case MeasureSpec.AT_MOST: case MeasureSpec.EXACTLY: result = specSize; break; } return result; } // 建议的最小宽度是由View的Background尺寸与通过设置View的miniXXX属性共同决定的 protected int getSuggestedMinimumWidth() { return (mBackground == null) ? mMinWidth : max(mMinWidth, mBackground.getMinimumWidth()); } // 建议的最小高度是由View的Background尺寸与通过设置View的miniXXX属性共同决定的 protected int getSuggestedMinimumHeight() { return (mBackground == null) ? mMinHeight : max(mMinHeight, mBackground.getMinimumHeight()); } // measure的主要目的就是对View树中的每个View的mMeasuredWidth和mMeasuredHeight进行赋值,所以一旦这两个变量被赋值意味着该View的测量工作结束 protected final void setMeasuredDimension(int measuredWidth, int measuredHeight) { boolean optical = isLayoutModeOptical(this); if (optical != isLayoutModeOptical(mParent)) { Insets insets = getOpticalInsets(); int opticalWidth = insets.left + insets.right; int opticalHeight = insets.top + insets.bottom; measuredWidth += optical ? opticalWidth : -opticalWidth; measuredHeight += optical ? opticalHeight : -opticalHeight; } setMeasuredDimensionRaw(measuredWidth, measuredHeight); }
|
4.ViewGroup类提供了measureChild,measureChild和measureChildWithMargins方法,主要是由继承自ViewGroup的(LinearLayout、FrameLayout等等)onMeasure()方法调用。
1 2 3 4 5 6 7 8 9 10 11 12 13 14 15 16 17
| protected void measureChildWithMargins(View child, int parentWidthMeasureSpec, int widthUsed, int parentHeightMeasureSpec, int heightUsed) { // 获取子视图的LayoutParams final MarginLayoutParams lp = (MarginLayoutParams) child.getLayoutParams(); // 调整MeasureSpec,通过这两个参数以及子视图本身的LayoutParams来共同决定子视图的测量规格 final int childWidthMeasureSpec = getChildMeasureSpec(parentWidthMeasureSpec, mPaddingLeft + mPaddingRight + lp.leftMargin + lp.rightMargin + widthUsed, lp.width); final int childHeightMeasureSpec = getChildMeasureSpec(parentHeightMeasureSpec, mPaddingTop + mPaddingBottom + lp.topMargin + lp.bottomMargin + heightUsed, lp.height); // 调用子View的measure方法,子View的measure中会回调子View的onMeasure方法 child.measure(childWidthMeasureSpec, childHeightMeasureSpec); }
|
5.只要是ViewGroup的子类就必须要求LayoutParams继承子MarginLayoutParams,否则无法使用layout_margin参数。
6.View的布局大小由父View和子View共同决定。
performLayout()方法目的是让父视图按照子视图的大小和布局参数,将子视图放置到合适的位置上。布局过程主要是通过调用View#layout()实现。

整个View树的源码layout流程图如下,转载自Android应用层View绘制流程与源码分析:

1 2 3 4 5 6 7 8
| private void performLayout(WindowManager.LayoutParams lp, int desiredWindowWidth, int desiredWindowHeight) { ...... final View host = mView; ...... host.layout(0, 0, host.getMeasuredWidth(), host.getMeasuredHeight()); ...... }
|
ViewGroup#layout()方法如下:
1 2 3 4 5 6
| @Override public final void layout(int l, int t, int r, int b) { ...... super.layout(l, t, r, b); ...... }
|
View#layout()方法如下:
1 2 3 4 5 6 7 8 9 10 11 12 13 14 15
| public void layout(int l, int t, int r, int b) { ...... // 实质都是调用setFrame方法把参数分别赋值给mLeft、mTop、mRight和mBottom这几个变量 boolean changed = isLayoutModeOptical(mParent) ? setOpticalFrame(l, t, r, b) : setFrame(l, t, r, b); // 需要重新layout if (changed || (mPrivateFlags & PFLAG_LAYOUT_REQUIRED) == PFLAG_LAYOUT_REQUIRED) { // 回调onLayout() onLayout(changed, l, t, r, b); ...... } ...... }
|
调用setFrame将位置的参数保存起来。如果这些值跟以前的相同则什么也不做,如果不同则进行重新赋值,并在赋值前,会给mPrivateFlags添加PFLAG_DRAWN的标识,同时调用invalidate告诉系统View视图原先占用的位置需要重绘。
ViewGroup#layout()和View#layout()对比
对比上面View的layout和ViewGroup的layout方法可以发现,View的layout方法是可以在子类重写的,而ViewGroup的layout是不能在子类重写的,言外之意就是说ViewGroup中只能通过重写onLayout方法。那我们接下来看下ViewGroup的onLayout方法,如下:
1 2 3
| @Override protected abstract void onLayout(boolean changed, int l, int t, int r, int b);
|
ViewGroup的onLayout()方法是一个抽象方法,这就是说所有ViewGroup的子类都必须重写这个方法。所以在自定义ViewGroup控件中,onLayout配合onMeasure方法一起使用可以实现自定义View的复杂布局。自定义View首先调用onMeasure进行测量,然后调用onLayout方法动态获取子View和子View的测量大小,然后进行layout布局。重载onLayout的目的就是安排其children在父View的具体位置,重载onLayout通常做法就是写一个for循环调用每一个子视图的layout(l, t, r, b)函数,传入不同的参数l, t, r, b来确定每个子视图在父视图中的显示位置。
View的onLayout()方法是一个空实现,如下:
1 2
| protected void onLayout(boolean changed, int left, int top, int right, int bottom) { }
|
所以通过一个现有的继承ViewGroup的控件分析:
LinearLayout#onLayout()方法如下:
1 2 3 4 5 6 7 8
| @Override protected void onLayout(boolean changed, int l, int t, int r, int b) { if (mOrientation == VERTICAL) { layoutVertical(l, t, r, b); } else { layoutHorizontal(l, t, r, b); } }
|
我们看LinearLayout#layoutVertical()方法:
1 2 3 4 5 6 7 8 9 10 11 12 13 14 15 16 17 18 19 20 21 22 23 24 25 26 27 28 29 30 31 32 33 34 35 36 37 38 39 40 41 42 43 44 45 46 47 48 49 50 51 52 53 54 55 56 57 58 59 60 61 62 63 64 65 66 67 68 69 70 71 72 73 74 75 76 77 78 79 80 81 82 83 84 85 86 87 88 89 90 91 92 93
| void layoutVertical(int left, int top, int right, int bottom) { final int paddingLeft = mPaddingLeft; int childTop; int childLeft; // Where right end of child should go // 计算父窗口推荐的子View的宽 final int width = right - left; // 计算父窗口推荐的子View右侧位置 int childRight = width - mPaddingRight; // Space available for child // child可使用空间大小 int childSpace = width - paddingLeft - mPaddingRight; // 通过ViewGroup的getChildCount方法获取ViewGroup的子View个数 final int count = getVirtualChildCount(); // 获取Gravity属性设置 final int majorGravity = mGravity & Gravity.VERTICAL_GRAVITY_MASK; final int minorGravity = mGravity & Gravity.RELATIVE_HORIZONTAL_GRAVITY_MASK; // 依据majorGravity计算childTop的位置值 switch (majorGravity) { case Gravity.BOTTOM: // mTotalLength contains the padding already childTop = mPaddingTop + bottom - top - mTotalLength; break; // mTotalLength contains the padding already case Gravity.CENTER_VERTICAL: childTop = mPaddingTop + (bottom - top - mTotalLength) / 2; break; case Gravity.TOP: default: childTop = mPaddingTop; break; } // 开始遍历 for (int i = 0; i < count; i++) { final View child = getVirtualChildAt(i); if (child == null) { childTop += measureNullChild(i); } else if (child.getVisibility() != GONE) { // LinearLayout中其子视图显示的宽和高由measure过程来决定的, // 因此measure过程的意义就是为layout过程提供视图显示范围的参考值 final int childWidth = child.getMeasuredWidth(); final int childHeight = child.getMeasuredHeight(); // 获取子View的LayoutParams final LinearLayout.LayoutParams lp = (LinearLayout.LayoutParams) child.getLayoutParams(); int gravity = lp.gravity; if (gravity < 0) { gravity = minorGravity; } final int layoutDirection = getLayoutDirection(); final int absoluteGravity = Gravity.getAbsoluteGravity(gravity, layoutDirection); // 依据不同的absoluteGravity计算childLeft位置 switch (absoluteGravity & Gravity.HORIZONTAL_GRAVITY_MASK) { case Gravity.CENTER_HORIZONTAL: childLeft = paddingLeft + ((childSpace - childWidth) / 2) + lp.leftMargin - lp.rightMargin; break; case Gravity.RIGHT: childLeft = childRight - childWidth - lp.rightMargin; break; case Gravity.LEFT: default: childLeft = paddingLeft + lp.leftMargin; break; } if (hasDividerBeforeChildAt(i)) { childTop += mDividerHeight; } childTop += lp.topMargin; // 通过垂直排列计算调用child的layout设置child的位置 setChildFrame(child, childLeft, childTop + getLocationOffset(child), childWidth, childHeight); childTop += childHeight + lp.bottomMargin + getNextLocationOffset(child); i += getChildrenSkipCount(child, i); } } }
|
从上面的分析可以看出,一般情况下layout过程会参考measure过程中计算得到的mMeasuredWidth和mMeasuredHeight来安排子View在父View中显示的位置,但这不是必须的,measure过程得到的结果可能完全没有实际用处。特别是对于一些自定义的ViewGroup,其子View的个数、位置和大小都是固定的,这时候可以忽略整个measure过程,只在layout函数中传入的4个参数来安排每个子View的具体位置。
结论:
1.View.layout方法可被重载,ViewGroup.layout为final的不可重载,ViewGroup.onLayout为abstract的,子类必须重载实现自己的位置逻辑。
2.measure操作完成后得到的是对每个View经测量过的measuredWidth和measuredHeight,layout操作完成之后得到的是对每个View进行位置分配后的mLeft、mTop、mRight、mBottom,这些值都是相对于父View来说的。
3.凡是layout_XXX的布局属性基本都针对的是包含子View的ViewGroup的,当对一个没有父容器的View设置相关layout_XXX属性是没有任何意义的。
4.使用View的getWidth()和getHeight()方法来获取View测量的宽高,必须保证这两个方法在onLayout流程之后被调用才能返回有效值。
getWidth()、getHeight()和getMeasuredWidth()、getMeasuredHeight()这两对方法之间的区别
上面分析measure过程已经说过getMeasuredWidth()、getMeasuredHeight()必须在onMeasure之后使用才有效。可以看出来getWidth()与getHeight()方法必须在layout(int l, int t, int r, int b)执行之后才有效。
每次重绘的时候并不会重新绘制每个View树的视图,而只是绘制那些“需要重绘”的,也就mPrivateFlags中含有PFLAG_DRAWN标识的视图。
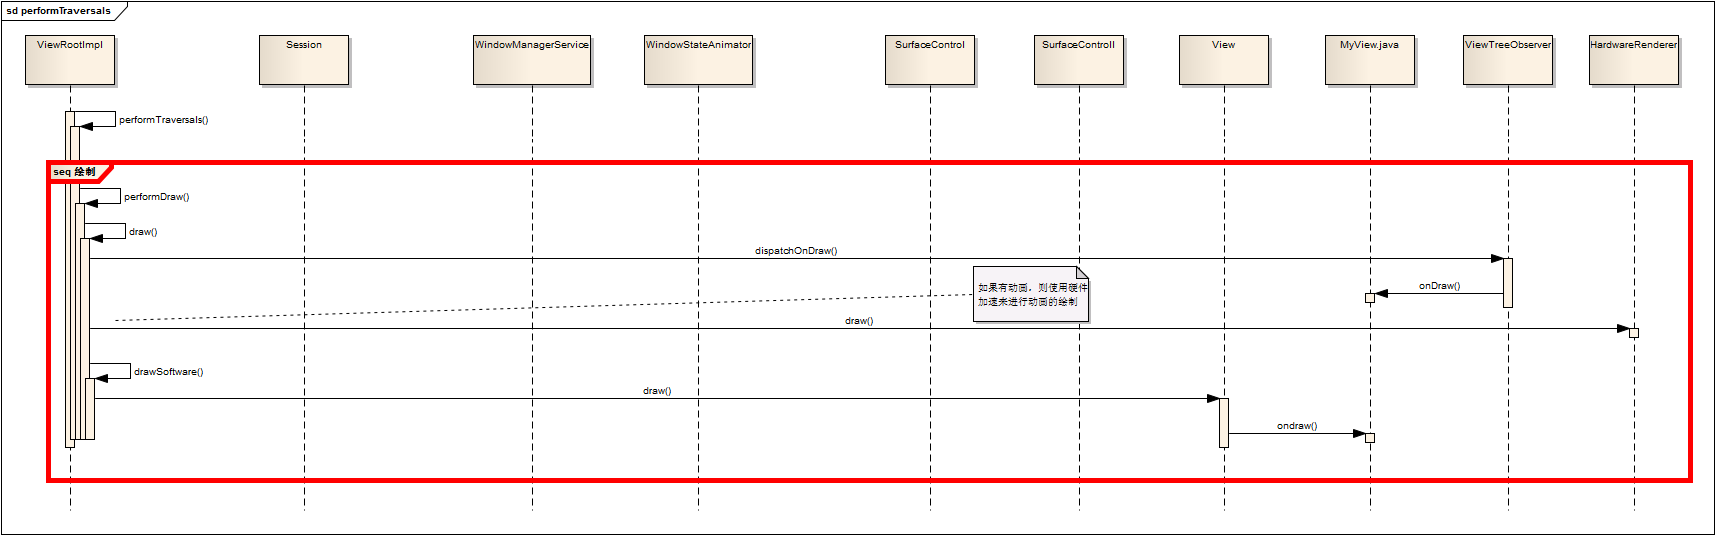
View#draw()方法有6个步骤,通过注释“skip step 2 & 5 if possible (common case)”,我们跳过2和5,看看其他几个步骤在做什么:
1.步骤1绘制View的背景:View#drawBackground(Canvas canvas)
获取xml中通过android:background属性或者代码中setBackgroundColor()、setBackgroundResource()等方法进行赋值的背景Drawable,根据layout过程确定的view的位置来设置背景的绘制区域,最终通过调用Drawable的draw()方法来完成背景的绘制工作。
2.步骤3对View的内容进行绘制:View#onDraw(Canvas canvas)
该方法是一个空方法,ViewGroup也并没有实现它,因为每个View的内容部分是各不相同的,所以需要由子类去实现具体逻辑。
3.步骤4对当前View的所有子View进行绘制,如果当前的View没有子View就不需要进行绘制:View#dispatchDraw(Canvas canvas)
该方法是一个空方法,而且注释说明了如果View包含子类需要重写它,所以ViewGroup重写了dispatchDraw方法,该方法内部会遍历每个子View,然后调用drawChild()方法
1 2 3
| protected boolean drawChild(Canvas canvas, View child, long drawingTime) { return child.draw(canvas, this, drawingTime); }
|
drawChild()方法最终调用了子View的draw()方法。
4.步骤6对View的各种装饰进行绘制(滚动条,前背景):View#onDrawForeground(Canvas canvas)
可以看见其实任何一个View都是有(水平垂直)滚动条的,只是一般情况下没让它显示而已。
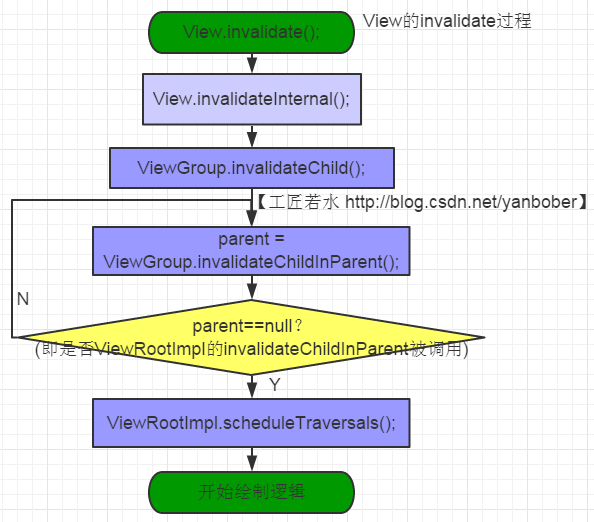
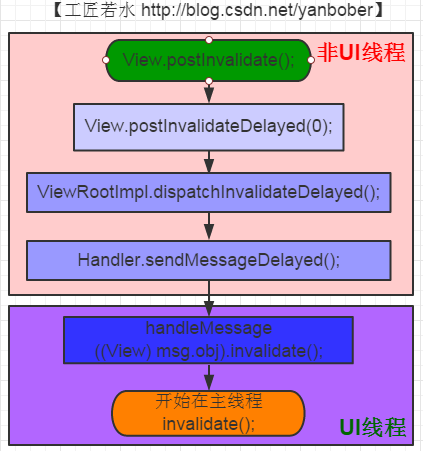
invalidate()与postInvalidate()总结
requestLayout()方法
View#requestLayout()最终调用到ViewRootImpl#requestLayout()方法,
1 2 3 4 5 6 7 8 9 10
| public void requestLayout() { ...... if (mParent != null && !mParent.isLayoutRequested()) { //由此向ViewParent请求布局 //从这个View开始向上一直requestLayout,最终到达ViewRootImpl的requestLayout mParent.requestLayout(); } ...... }
|
ViewRootImpl#requestLayout()方法如下:
1 2 3 4 5 6 7 8 9
| @Override public void requestLayout() { if (!mHandlingLayoutInLayoutRequest) { checkThread(); mLayoutRequested = true; // View调用requestLayout最终层层上传到ViewRootImpl后最终触发了该方法 scheduleTraversals(); } }
|
requestLayout()方法会调用measure过程和layout过程,不会调用draw过程,也不会重新绘制任何View包括该调用者本身。
参考
- View绘制流程
- 浅析 android 应用界面的展现流程(四)创建绘制表面
- 《Android开发艺术探索》
- Android应用层View绘制流程与源码分析