摘要
本文参照Android 开发绕不过的坑:你的 Bitmap 究竟占多大内存?进行实验,并copy重要部分。
Android中的长度单位
屏幕尺寸:设备的物理屏幕尺寸,指屏幕的对角线的长度
PX:屏幕实际的像素
DP:密度无关的像素
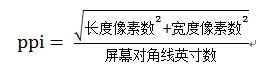
PPI & DPI :
PPI vs. DPI: what’s the difference?
翻译
阅读文章,能明确知道:
dpi 是打印的参数,越大图片中不同颜色的过度就会越平滑。
ppi 是对于图片中一个一个像素而言的,ppi越大,图片打印出来就越小。
关于DPI & PPI & DP & PX & density的几个转换公式:
density = dpi / 160;
PX = density * DP;
在Android中,将屏幕密度为160dpi的中密度设备屏幕作为基准屏幕,在这个屏幕中,1dp=1px。其他屏幕密度的设备按照比例换算,具体如下表:
| 密度 |
ldpi |
mdpi |
hdpi |
xhdpi |
xxhdpi |
xxxhdpi |
| dpi范围 |
0-120 |
120-160 |
160-240 |
240-320 |
320-480 |
480-640 |
| 比例 |
0.75 |
1 |
1.5 |
2 |
3 |
4 |
获取设备的属性
1 2 3 4 5 6 7 8
| DisplayMetrics displayMetrics = getResources().getDisplayMetrics(); float density = displayMetrics.density; //屏幕密度 int densityDpi = displayMetrics.densityDpi;//屏幕密度dpi int heightPixels = displayMetrics.heightPixels;//屏幕高度的像素 int widthPixels = displayMetrics.widthPixels;//屏幕宽度的像素 float scaledDensity = displayMetrics.scaledDensity;//字体的放大系数 float xdpi = displayMetrics.xdpi;//宽度方向上的dpi float ydpi = displayMetrics.ydpi;//高度方向上的dpi
|
在模拟器Nexus 5X上的属性为:density=2.625;densityDpi=420;heightPixels=1794;widthPixels=1080;xdpi=420.0;ydpi=420.0
一张Bitmap到底占多大内存?
Android API 有个方便的方法,
1 2 3 4
| public final int getByteCount() { // int result permits bitmaps up to 46,340 x 46,340 return getRowBytes() * getHeight(); }
|
通过这个方法,我们就可以获取到一张 Bitmap 在运行时到底占用多大内存了。
举例
使用一张1080*1920的PSD,导出四张图片,
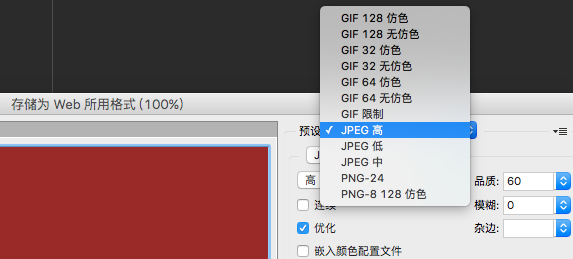
分别对应PNG-24(test.png;168KB),JPEG高(test_h.jpg;111KB),JPEG中(test_m.jpg;61KB),JPEG低(test_l.jpg;43KB),这四张图片都是1080*1920的规格。
使用
1
| BitmapFactory.decodeResource(getResources(), R.drawable.test_l);
|
默认色彩格式为ARGB_8888
1
| public Bitmap.Config inPreferredConfig = Bitmap.Config.ARGB_8888;
|
将test.png放在drawable-nodpi目录下,在模拟器Nexus 5X上加载,占用内存byteCount=8294400B;width=1080px;height=1920px。
将test.png放在drawable-xxhdpi目录下,在模拟器Nexus 5X上加载,占用内存
byteCount=6350400B;width=945px;height=1680px。
getByteCount()
Bitmap#getByteCount()
1 2 3 4 5 6
| public final int getRowBytes() { if (mRecycled) { Log.w(TAG, "Called getRowBytes() on a recycle()'d bitmap! This is undefined behavior!"); } return nativeRowBytes(mNativePtr); }
|
Bitmap.cpp
1 2 3 4 5 6
| { "nativeRowBytes", "(J)I", (void*)Bitmap_rowBytes } static jint Bitmap_rowBytes(JNIEnv* env, jobject, jlong bitmapHandle) { LocalScopedBitmap bitmap(bitmapHandle); return static_cast<jint>(bitmap->rowBytes()); }
|
最终调用
1 2 3 4 5
| size_t Bitmap::rowBytes() const { return mPixelRef->rowBytes(); } size_t rowBytes() const { return mRowBytes; }
|
我们知道 ARGB_8888(也就是我们最常用的 Bitmap 的格式)的一个像素占用 4byte,那么 rowBytes 实际上就是 4*width bytes。
那么结论出来了,一张 ARGB_8888 的 Bitmap 占用内存的计算公式
bitmapInRam = bitmapWidth * bitmapHeight * 4 bytes
但是,这样算出来的和我们通过API拿到的并不相同!!
density
我们读取的是 drawable 目录下面的图片,用的是 decodeResource 方法,该方法本质上就两步:
读取原始资源,这个调用了 Resource.openRawResource 方法,这个方法调用完成之后会对 TypedValue 进行赋值,其中包含了原始资源的 density 等信息;
调用 decodeResourceStream 对原始资源进行解码和适配。这个过程实际上就是原始资源的 density 到屏幕 density 的一个映射。
很明显,原始资源的density其实取决于资源存放的目录(比如xxhdpi对应的是480),而屏幕density的赋值,请看下面这段代码:
1 2 3 4 5 6 7 8 9 10 11 12 13 14 15 16 17 18 19 20 21 22 23 24 25 26 27 28 29
| /** * Decode a new Bitmap from an InputStream. This InputStream was obtained from * resources, which we pass to be able to scale the bitmap accordingly. */ public static Bitmap decodeResourceStream(Resources res, TypedValue value, InputStream is, Rect pad, Options opts) { if (opts == null) { opts = new Options(); } if (opts.inDensity == 0 && value != null) { final int density = value.density; if (density == TypedValue.DENSITY_DEFAULT) { // 默认为160(对应mdpi) opts.inDensity = DisplayMetrics.DENSITY_DEFAULT; } else if (density != TypedValue.DENSITY_NONE) { // 这里density的值如果对应资源目录为hdpi的话,就是240,以此类推 opts.inDensity = density; } } if (opts.inTargetDensity == 0 && res != null) { // 当前屏幕显示密度 opts.inTargetDensity = res.getDisplayMetrics().densityDpi; } return decodeStream(is, pad, opts); }
|
从代码赋值可以看出,我们最关注的是opts.inDensity和opts.inTargetDensity。
继续看代码
Bitmap#decodeStream(InputStream is, Rect outPadding, Options opts) –>
Bitmap#decodeStreamInternal(InputStream is, Rect outPadding, Options opts) –>
Bitmap#nativeDecodeStream(InputStream is, byte[] storage,
Rect padding, Options opts)
最终调用到BitmapFactory.cpp中doDecode方法:
1 2 3 4 5 6 7 8 9 10 11 12 13 14 15 16 17 18 19 20 21 22 23 24 25 26 27 28 29 30 31 32 33 34 35 36 37 38 39 40 41 42 43 44 45 46 47 48 49 50 51 52 53 54 55 56 57 58 59 60 61 62 63 64
| static jobject doDecode(JNIEnv* env, SkStreamRewindable* stream, jobject padding, jobject options) { ...... if (options != NULL) { ...... if (env->GetBooleanField(options, gOptions_scaledFieldID)) { // 原始资源的density,跟随存放目录变化,对应hdpi是240,xhdpi是320,以此类推 const int density = env->GetIntField(options, gOptions_densityFieldID); // 屏幕的density,Nexus 5X为420 const int targetDensity = env->GetIntField(options, gOptions_targetDensityFieldID); const int screenDensity = env->GetIntField(options, gOptions_screenDensityFieldID); if (density != 0 && targetDensity != 0 && density != screenDensity) { scale = (float) targetDensity / density; } } } ...... int scaledWidth = size.width(); int scaledHeight = size.height(); bool willScale = false; // Apply a fine scaling step if necessary. if (needsFineScale(codec->getInfo().dimensions(), size, sampleSize)) { willScale = true; scaledWidth = codec->getInfo().width() / sampleSize; scaledHeight = codec->getInfo().height() / sampleSize; } ...... // 所以一张1080*1920的PNG图片,把它放到drawable-xxhdpi目录下,在Nexus 5X上加载 // scaledWidth = int( 1080 * 420 / 480f + 0.5) = int(945.5) = 945 // scaledHeight = int( 1920 * 420 / 480f + 0.5) = int(1680.5) = 1680 // Scale is necessary due to density differences. if (scale != 1.0f) { willScale = true; scaledWidth = static_cast<int>(scaledWidth * scale + 0.5f); scaledHeight = static_cast<int>(scaledHeight * scale + 0.5f); } ...... SkBitmap outputBitmap; if (willScale) { // This is weird so let me explain: we could use the scale parameter // directly, but for historical reasons this is how the corresponding // Dalvik code has always behaved. We simply recreate the behavior here. // The result is slightly different from simply using scale because of // the 0.5f rounding bias applied when computing the target image size const float sx = scaledWidth / float(decodingBitmap.width()); const float sy = scaledHeight / float(decodingBitmap.height()); ...... SkCanvas canvas(outputBitmap); // 缩放画布 canvas.scale(sx, sy); canvas.drawBitmap(decodingBitmap, 0.0f, 0.0f, &paint); } else { outputBitmap.swap(decodingBitmap); } ...... }
|
代码中的sx和sy应该是约等于scale的,可以套用算一下,因为 scaledWidth 和 scaledHeight 是由 width 和 height 乘以 scale 得到的。我们看到 Canvas 放大了 scale 倍,然后又把读到内存的这张 bitmap 画上去,相当于把这张 bitmap 放大了 scale 倍。
所以一张1080*1920的PNG图片,把它放到drawable-xxhdpi目录下,在Nexus 5X上加载,
scaledWidth=int(1080*420/480f+0.5)=int(945.5)=945;
scaledHeight=int(1920*420/480f+0.5)=int(1680.5)=1680;
而:
945*1680=66350400
小结
通过以上分析,我们知道,Bitmap在内存当中占用的大小其实取决于:
色彩格式,前面我们已经提到,如果是 ARGB8888 那么就是一个像素4个字节,如果是 RGB_565 那就是2个字节;
原始文件存放的资源目录(是 hdpi 还是 xxhdpi等);
目标屏幕的密度。
如何减少Bitmap的内存占用?
刚刚我们说到从一张PSD导出四种文件格式的图片,PNG-24(test.png;168KB),JPEG高(test_h.jpg;111KB),JPEG中(test_m.jpg;61KB),JPEG低(test_l.jpg;43KB),这四张图片都是1080*1920的规格。
从括号内的标注可以看到,jpg图片占用内存确实比png少,原因很简单,jpg是一种有损压缩的图片存储格式,而png则是无损压缩的图片存储格式。
但是以上说的是文件存储范畴的事,它们只存在于文件系统,而非内存或者显存。所以同样规格的1080*1920的图片,使用jpg或者png在内存当中并没有什么不同。
实验结果表明,使用相同的色彩格式:
一张1080*1920的test_l.jpg图片,把它放到drawable-xxhdpi目录下,在Nexus 5X上加载,
和
一张1080*1920的test.png图片,把它放到drawable-xxhdpi目录下,在Nexus 5X上加载,
内存占用均为byteCount=6350400B。
当然,上述前提是都使用相同的色彩格式,因为jpg的图片没有alpha通道,所以读到内存的时候如果用RGB_565的格式存到内存,大小只有ARGB_8888的一半。
jpg和png二者差别主要体现在:
alpha是否真的需要?如果需要 alpha 通道,那么没有别的选择,用 png;
图色值丰富还是单调?就像刚才提到的,如果色值丰富,那么用jpg,如果作为按钮的背景,请用png。(jpg不适用于所含颜色很少、具有大块颜色相近的区域或亮度差异十分明显的较简单的图片。对于需要高保真的较复杂的图像,png虽然能无损压缩,但图片文件较大);
对安装包大小的要求是否非常严格?如果你的 app 资源很少,安装包大小问题不是很凸显,看情况选择jpg或者png;
目标用户的cpu是否强劲?jpg的图像压缩算法比png耗时。
所以想减少Bitmap的内存占用:
使用inSampleSize
官方提供的方式为:
1 2 3 4 5 6 7 8 9 10 11 12 13 14 15 16 17 18 19 20 21 22 23 24 25 26 27 28 29 30 31 32 33 34 35 36 37 38 39 40
| public static int calculateInSampleSize(BitmapFactory.Options options, int reqWidth, int reqHeight) { // BEGIN_INCLUDE (calculate_sample_size) // Raw height and width of image final int height = options.outHeight; final int width = options.outWidth; int inSampleSize = 1; if (height > reqHeight || width > reqWidth) { final int halfHeight = height / 2; final int halfWidth = width / 2; // Calculate the largest inSampleSize value that is a power of 2 and keeps both // height and width larger than the requested height and width. while ((halfHeight / inSampleSize) > reqHeight && (halfWidth / inSampleSize) > reqWidth) { inSampleSize *= 2; } // This offers some additional logic in case the image has a strange // aspect ratio. For example, a panorama may have a much larger // width than height. In these cases the total pixels might still // end up being too large to fit comfortably in memory, so we should // be more aggressive with sample down the image (=larger inSampleSize). long totalPixels = width * height / inSampleSize; // Anything more than 2x the requested pixels we'll sample down further final long totalReqPixelsCap = reqWidth * reqHeight * 2; while (totalPixels > totalReqPixelsCap) { inSampleSize *= 2; totalPixels /= 2; } } return inSampleSize; // END_INCLUDE (calculate_sample_size) }
|
使用矩阵(使用方式待完善)
大图小用用采样,小图大用用矩阵。
合理选择Bitmap的像素格式
| 格式 |
描述 |
| ALPHA_8 |
只有一个alpha通道,每个像素占8bit,1Byte |
| ARGB_4444 |
这个从API 13开始不建议使用,因为质量太差 |
| ARGB_8888 |
ARGB四个通道,每个通道8bit,每个像素占4Byte |
| RGB_565 |
RGB三个通道,红色占5bit,绿色占6bit,蓝色占5bit,每个像素占2Byt |
索引位图
具体查看Android 开发绕不过的坑:你的 Bitmap 究竟占多大内存?
参考
- Android 开发绕不过的坑:你的 Bitmap 究竟占多大内存?
- 那些值得你去细细研究的Drawable适配
- PPI vs. DPI: what’s the difference?