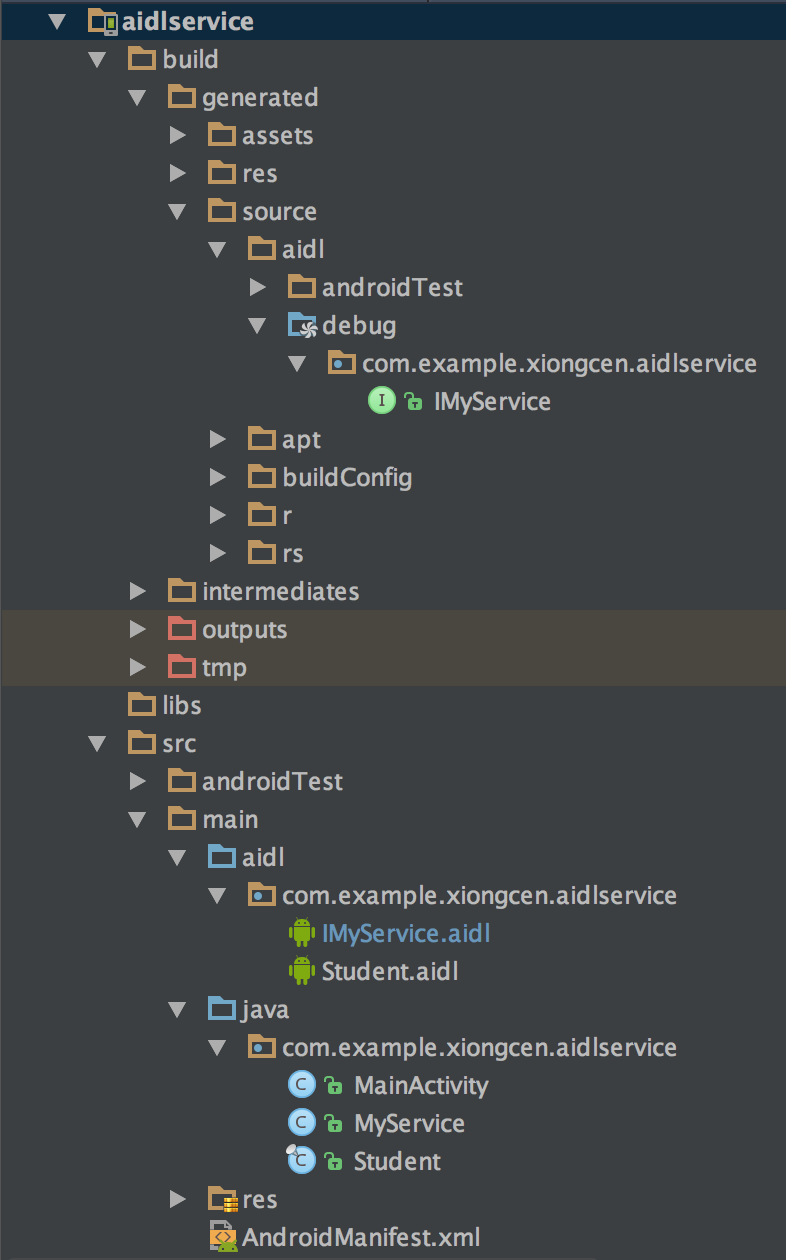
package com.example.xiongcen.aidlservice;
// IMyService.java类继承了IInterface接口,同时自己也还是个接口,所有可以在Binder中传输的
// 接口都需要继承android.os.IInterface接口。
public interface IMyService extends android.os.IInterface {
/**
* Local-side IPC implementation stub class.
*/
public static abstract class Stub extends android.os.Binder implements com.example.xiongcen.aidlservice.IMyService {
// Binder的唯一标识
private static final java.lang.String DESCRIPTOR = "com.example.xiongcen.aidlservice.IMyService";
/**
* Construct the stub at attach it to the interface.
*/
public Stub() {
this.attachInterface(this, DESCRIPTOR);
}
/**
* Cast an IBinder object into an com.example.xiongcen.aidlservice.IMyService interface,
* generating a proxy if needed.
*/
// 用于将服务端的Binder对象转换成客户端所需的AIDL接口类型的对象,
// 这种转换过程是区分进程的,如果客户端和服务端位于同一进程,
// 那么此方法返回的就是服务端的Stub对象本身,
// 否则返回的是由系统封装后的Stub.Proxy对象
public static com.example.xiongcen.aidlservice.IMyService asInterface(android.os.IBinder obj) {
if ((obj == null)) {
return null;
}
android.os.IInterface iin = obj.queryLocalInterface(DESCRIPTOR);
if (((iin != null) && (iin instanceof com.example.xiongcen.aidlservice.IMyService))) {
return ((com.example.xiongcen.aidlservice.IMyService) iin);
}
return new com.example.xiongcen.aidlservice.IMyService.Stub.Proxy(obj);
}
// 此方法用于返回当前Binder对象
@Override
public android.os.IBinder asBinder() {
return this;
}
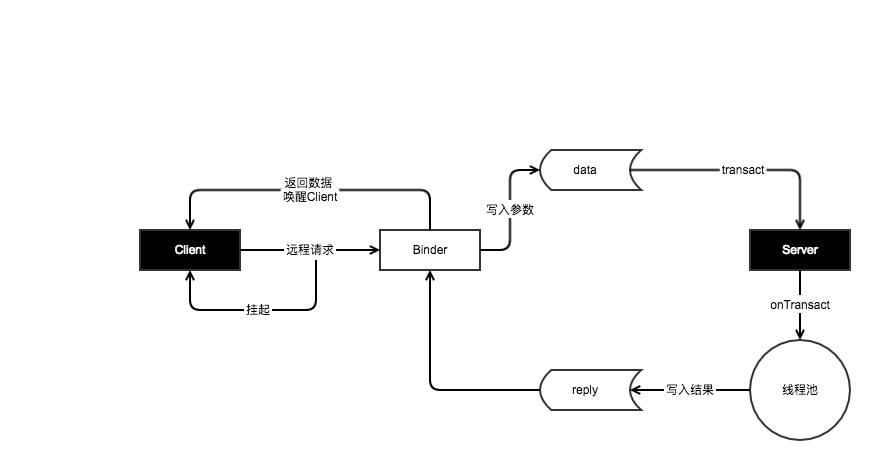
// 该方法运行在服务端中的Binder线程池中。
// 当客户端发起跨进程请求时,远程请求会通过系统底层封装后交由此方法来处理。
// 服务端通过code可以确定客户端请求的目标方法是什么,
// 接着从data中取出目标方法所需的参数(如果目标方法有参数的话),
// 然后执行目标方法,
// 当目标方法执行完毕后,就向reply中写入返回值(如果目标方法有返回值的话)。
// 需要注意的是,如果该方法返回false,那么客户端的请求会失败。
// 因此可以利用这个特性来做权限校验。
@Override
public boolean onTransact(int code, android.os.Parcel data, android.os.Parcel reply, int flags) throws android.os.RemoteException {
switch (code) {
case INTERFACE_TRANSACTION: {
reply.writeString(DESCRIPTOR);
return true;
}
case TRANSACTION_getStudent: {
data.enforceInterface(DESCRIPTOR);
java.util.List<com.example.xiongcen.aidlservice.Student> _result = this.getStudent();
reply.writeNoException();
reply.writeTypedList(_result);
return true;
}
case TRANSACTION_addStudent: {
data.enforceInterface(DESCRIPTOR);
com.example.xiongcen.aidlservice.Student _arg0;
if ((0 != data.readInt())) {
_arg0 = com.example.xiongcen.aidlservice.Student.CREATOR.createFromParcel(data);
} else {
_arg0 = null;
}
this.addStudent(_arg0);
reply.writeNoException();
return true;
}
}
return super.onTransact(code, data, reply, flags);
}
private static class Proxy implements com.example.xiongcen.aidlservice.IMyService {
private android.os.IBinder mRemote;
Proxy(android.os.IBinder remote) {
mRemote = remote;
}
@Override
public android.os.IBinder asBinder() {
return mRemote;
}
public java.lang.String getInterfaceDescriptor() {
return DESCRIPTOR;
}
// 该方法运行在客户端。当客户端远程调用此方法时,
// 首先创建该方法所需要的输入型Parcel对象_data,
// 输出型Parcel对象_reply和返回值对象List,
// 然后把该方法的参数信息写入_data中(如果有参数的话),
// 接着调用transact方法来发起RPC(远程过程调用)请求,同时当前线程挂起,
// 然后服务端的onTransact方法会被调用,直到RPC过程返回后,当前线程继续执行,
// 并从_reply中取出RPC过程的返回结果,最后返回_reply中的数据。
@Override
public java.util.List<com.example.xiongcen.aidlservice.Student> getStudent() throws android.os.RemoteException {
android.os.Parcel _data = android.os.Parcel.obtain();
android.os.Parcel _reply = android.os.Parcel.obtain();
java.util.List<com.example.xiongcen.aidlservice.Student> _result;
try {
_data.writeInterfaceToken(DESCRIPTOR);
mRemote.transact(Stub.TRANSACTION_getStudent, _data, _reply, 0);
_reply.readException();
_result = _reply.createTypedArrayList(com.example.xiongcen.aidlservice.Student.CREATOR);
} finally {
_reply.recycle();
_data.recycle();
}
return _result;
}
// 同上分析,只不过addStudent方法没有返回值,所以它不需要从_reply中取出返回值
@Override
public void addStudent(com.example.xiongcen.aidlservice.Student student) throws android.os.RemoteException {
android.os.Parcel _data = android.os.Parcel.obtain();
android.os.Parcel _reply = android.os.Parcel.obtain();
try {
_data.writeInterfaceToken(DESCRIPTOR);
if ((student != null)) {
_data.writeInt(1);
student.writeToParcel(_data, 0);
} else {
_data.writeInt(0);
}
mRemote.transact(Stub.TRANSACTION_addStudent, _data, _reply, 0);
_reply.readException();
} finally {
_reply.recycle();
_data.recycle();
}
}
}
// IMyService.java类声明两个整型的id分别用于标识这两个方法,
// 这两个id用于标识在transact过程中客户端所请求的到底是哪个方法。
static final int TRANSACTION_getStudent = (android.os.IBinder.FIRST_CALL_TRANSACTION + 0);
static final int TRANSACTION_addStudent = (android.os.IBinder.FIRST_CALL_TRANSACTION + 1);
}
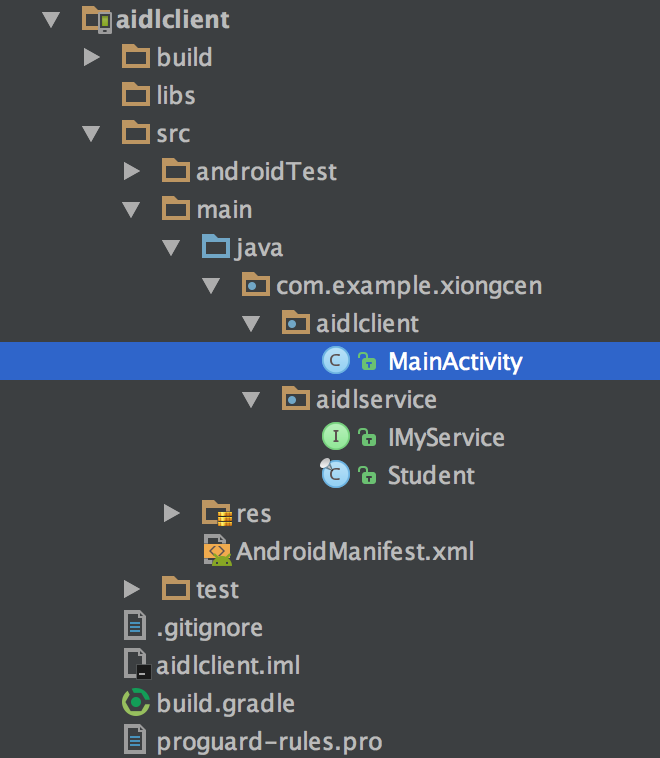
// IMyService.java类声明两个方法getStudent()和addStudent(),
// 这显然就是我们在IMyService.aidl中所声明的方法。
public java.util.List<com.example.xiongcen.aidlservice.Student> getStudent() throws android.os.RemoteException;
public void addStudent(com.example.xiongcen.aidlservice.Student student) throws android.os.RemoteException;
}